Posts

Showing posts from October, 2019

[Reverse Eng] Progess 1

Image
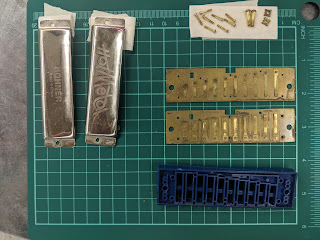
Harmonica to the Save. Incredibly happy to be switching this project into a more manageable time expense through the next weeks. Its always a very important thing to discuss your limitations and to work within them. Scaling a scope is nothing to be embarrassed about, as long as its communicated efficiently. Don't be afraid to talk to your teachers.  The process of deconstruction was met with less anxiety as  these parts are strategic but manageable. I have totally  Scaled down and that anxiety has lifted so I could make head way. Success! Also the fact that this also makes noise - as I think I have  a noise appreciation - is very exciting.  I started with the blue interior. Measuring and scaling the parts in 2D.  Using tangent circles to find missing geometry have been very helpful.  Aslo double checking measurements. as the accuracy has helped with pin pointing eye captivating perfection.  Here is where I have g

Reverse Engineered Project: Selection

Image
What to pick, what to do????  Finding an object was actually not that easy. Considering what is mechanical and doesn't require a Circuit board. Also thinking about what is going to look interesting in an exploded view.  My first object that I found and was intrigued with was this little music make. My daughter broke a snow globe and this little wind up mechanical music make came out from the bottom.  This is very small possibly 2" by 2". Also found out vie Brian that it would be very difficult to open the wind up mechanism - as the force could be volatile. Which is worry some.  However this would be such an a cool item to 3D print and replicate. I am very interested in automatons and antique or old world mechanics. This could be valuable learning information later on in my practice. The next object!! check out this amazing thrift store find! Originally it was for my daughter but I have quickly adopted as one of my favorite outing props

First 3D printed shell

https://www.buzznick.com/3-d-printed-tortoise-shell/

mechanical object 5

Image

Drafting a Gear

Image
[Rotate] the One Arm [arc] Radius> Startpoint > Endpoint > Radius = # [Fillet] [snip] [Extrude] Selecting the outside and inside curves.  Second extrusion is selecting smallest circle and medium curve circle and extruding both seperatly

Creating 3D objects

Image
I started out by creating a rectangle with the top view.  There I could pin point the hollow circles.  Now it was about finding the the rectangle for the second wall of the object.  EXTRUDE!  In order to make sense of the holes. [booleandifference] was used. I noticed there was a difference so  highlighting both circle curves you extrude a second curve but with a depth 5 points less than the surface.  Now selecting the next piece that will rise. Creating a  I have Extruded! and looking for the dimension to which I will take [Booleandifference]  Creating points for the decreasing.  [Booleandifference] Creating those [Chamfer]s COMPLETED!